My external hard drive suddenly stopped mounting on my Mac, and I need to access important files on it right away. It was working fine before, but now it shows up inconsistently or not at all, and I’m worried about losing data. I need help troubleshooting an external hard drive not mounting on Mac so I can recover my files as quickly as possible.
I've run into this on my Mac enough times that I stopped assuming the drive was dead the second it refused to show up. Early on, I did the usual panic thing and figured my files were gone. Most of the time, I was wrong. The drive itself was fine. What broke was the file system, or macOS got hung up on a background check, or the volume sat there and refused to mount for no clear reason.
Before doing anything heavy, I always check the simple stuff first.
Plug the drive straight into your Mac. Skip the hub or dock for now. Try a different cable. Move it to another USB or Thunderbolt port. If you have another computer nearby, test the drive there too. Also check Finder settings and make sure external disks are set to appear on both the desktop and the sidebar.
If the drive shows up in Disk Utility and the size looks about right, I usually take that as a good sign.
This only applies to drives with no obvious hardware failure. If the drive does not appear in Disk Utility at all, shows nonsense capacity, drops connection over and over, clicks, or does not power up, you're looking at a physical issue more than a mount problem. At that point, software fixes tend to go nowhere.
If the hardware still seems healthy, these are the steps I'd try.
Method 1: Run First Aid on the Parent Drive
This is the first thing I do because it's built into macOS and takes almost no effort.
1. Open Disk Utility.
2. Click View > Show All Devices.
3. Pick the physical drive at the top, not only the volume under it.
4. Click First Aid.
5. Approve the scan.
6. Wait for it to finish, then try mounting the drive again.
If the problem is a small file system error, this sometimes fixes it without much drama.
Method 2: Kill a Hung fsck Process
I've seen macOS get stuck running a file system check after a drive was unplugged badly. When it hangs, the drive can stay inaccessible even though the hardware is okay.
1. Open Terminal.
2. Enter: sudo pkill -f fsck
3. Press Return.
4. Type your admin password if asked.
5. Wait a bit.
6. Check the drive again.
This does not repair corruption. It only gets rid of a process that's blocking the mount.
Method 3: Mount It Yourself in Terminal
Sometimes the volume is sitting there, intact enough, and macOS still won't mount it on its own. I've had manual mounting work when Finder acted useless.
1. Open Terminal.
2. Run: diskutil list
3. Find your drive identifier, something like disk4s1.
4. Run: diskutil mount /dev/disk4s1
5. Replace disk4s1 with your actual identifier.
6. Press Return.
7. Read the result in Terminal.
If it works, the volume usually appears right away.
Method 4: Erase and Reformat
If none of the earlier steps help, reformatting is the last stop.
1. Open Disk Utility.
2. Click View > Show All Devices.
3. Select the physical drive.
4. Click Erase.
5. Name the drive.
6. Pick APFS if you'll use it only with Macs, or exFAT if you need Windows support too.
7. Click Erase.
8. Let it finish.
One thing I learned the hard way. If the files matter, don't start with repair attempts. All of the steps above are aimed at getting the drive mountable again, not protecting the data first. Some repairs change file system structures while trying to fix them. Formatting is the obvious example, but even repair tools can make later recovery harder.
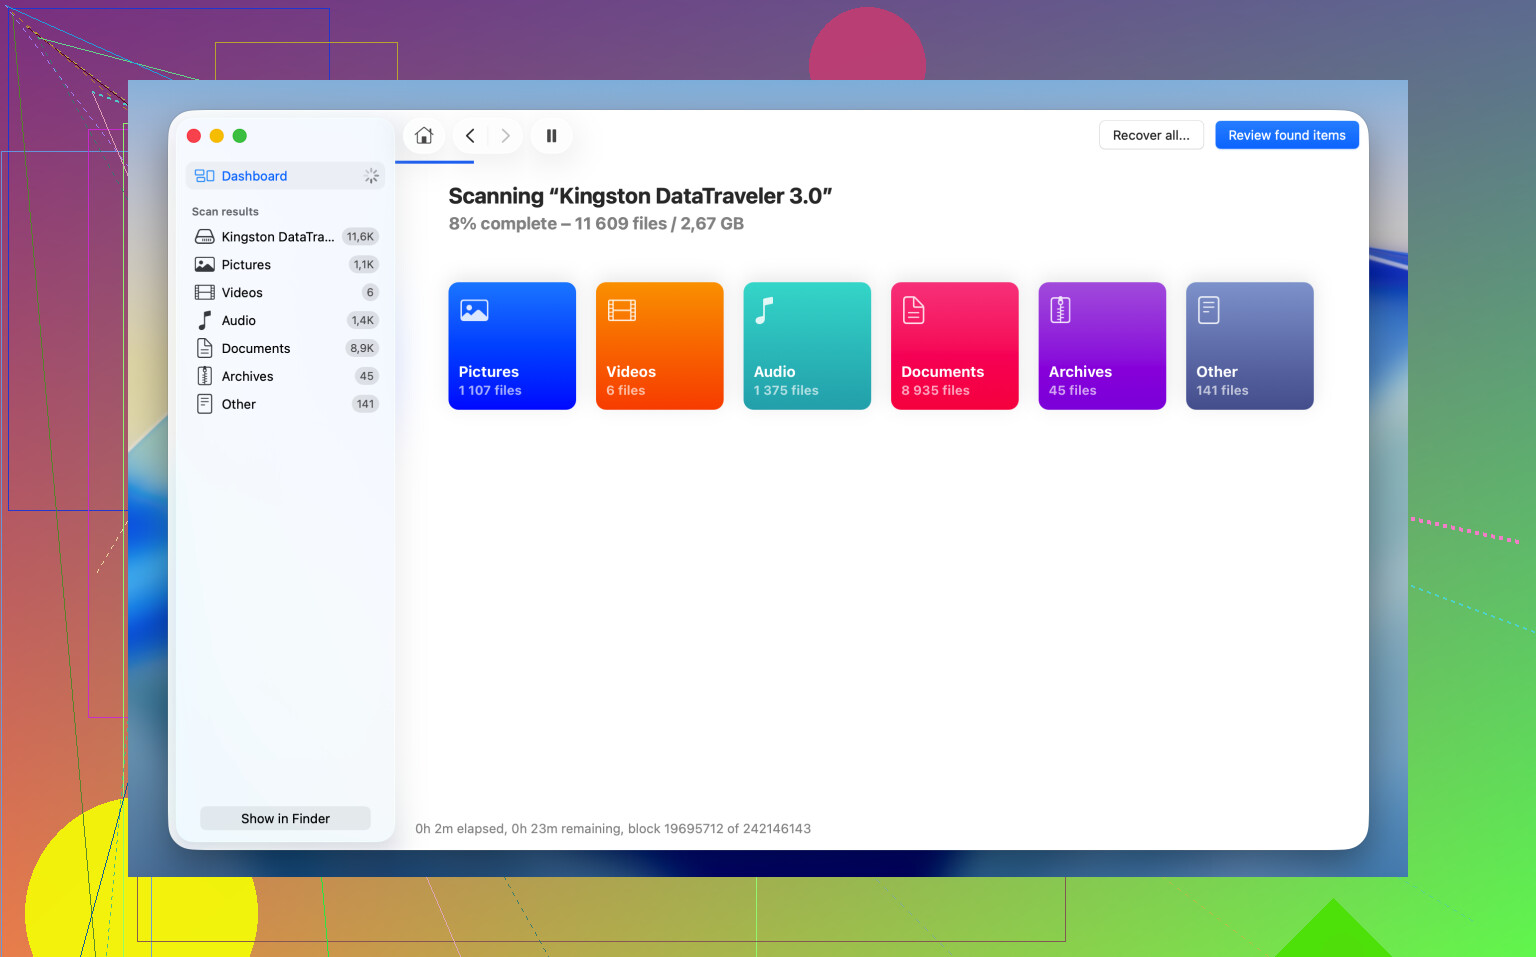
What I do first now is recover the files, then mess with repairs after. I usually use Disk Drill for this kind of case, mostly when the drive shows in Disk Utility but refuses to mount in Finder. macOS tends to give up fast when the file system is damaged. Disk Drill talks to the device more directly and scans for recoverable data even when Finder won't cooperate.
The part I keep coming back to is the Byte-to-byte Backup option. If the drive is flaky, disconnects randomly, or feels unstable, I make an image first. It copies every readable sector into an image file so you work from the copy instead of hammering the original drive again and again. Saved me once when a drive kept dropping off mid-scan, kinda ugly situation.
The recovery flow is simple enough:
1. Download and open Disk Drill.
2. Pick the unmounted drive from the list.
3. Create a Byte-to-byte Backup first if the drive looks unstable.
4. Scan the drive, or scan the backup image.
5. Look through the files it finds.
6. Preview important files and make sure they open.
7. Recover them to a different drive.
After your files are safe somewhere else, go back and try the repair steps. At that point, if a fix goes sideways, you aren't making a bad problem worse.
1 Like
If the files matter, stop trying random mount attempts after 2 or 3 tries. Repeated spin-ups and remounts are rough on a failing drive. I differ a bit from @mikeappsreviewer there. Repair first is fine for a healthy disk. For an inconsistent disk, I’d verify what macOS sees before any repair.
Do this.
- Open System Information.
- Go to USB or Thunderbolt.
- See if the enclosure appears there.
If it shows there, your Mac sees the hardware layer. If it does not, think cable, port, power, enclosure board, or the drive itself.
Next, check SMART status if Disk Utility shows the physical disk. Use a tool like DriveDx, or Terminal with:
diskutil info diskX
Look for SMART status if supported. Failing, Not Supported on many USB bridges, or weird read errors all point different ways.
Big one people miss. If this is a desktop external drive with its own power brick, listen and feel. Smooth spin is normal. Clicks, spin-down loops, or slow beeping are bad signs. If it’s a portable HDD, plug it into a powered port or use a proper adapter. Low power causes lots of ‘shows up, then vanishes’ junk.
Also check if the issue is the enclosure, not the disk. I’ve seen USB-SATA bridge boards die while the bare drive was fine. If you’re comfortable opening it and it’s out of warranty, putting the drive in another compatible enclosure or SATA dock sometimes gets instant access. Do not do this with encrypted or odd proprietary setups unless you know the enclosure is standard.
If you need the files now, skip erase/reformat. Use Disk Drill and scan the drive or, better, clone/image it first if the connection is shaky. It’s a solid pick for Mac external drive recovery and file recovery from unmountable disks. This guide to top data recovery software for Mac and external drives is worth a look too.
One more thing. If the drive was ever formatted NTFS, some Macs see it weirdly, esp after updates. Tuxera or Paragon issues have caused mount messes for pepole before. Safe Mode on the Mac is worth one test, since it disables a lot of third-party junk.
I’d do one thing a little differently than @mikeappsreviewer and @sognonotturno: before more repair attempts, check the system logs. Sometimes macOS is actually telling you why it refuses to mount, and that saves a lot of blind poking around.
Open Console, then plug the drive in and watch for messages related to diskarbitrationd, kernel, I/O error, or media is not present. If you see repeated I/O errors, that usually means hardware trouble, not just a stubborn volume. If you see permission or file system complaints, then the disk may still be readable enough for recovery.
Another thing people skip is Recovery Mode. Boot into macOS Recovery and open Disk Utility there. If the drive mounts in Recovery but not in normal boot, that points to a software conflict on your main system, not neccecarily a dead disk. Safe Mode can help for the same reason, but Recovery Mode is cleaner for testing.
If the drive is encrypted, also check whether it’s waiting for an unlock prompt that never appears. In Terminal you can try:
diskutil apfs list
If you see an APFS encrypted volume, it may need manual unlocking rather than normal mounting.
I would not keep reconnecting it over and over if it’s appearing inconsistently. That’s where things go bad fast. If the files matter, switch to recovery mode in the general sense, not Apple Recovery specifically. Disk Drill is actually a sensible move here, especially if the drive is visible to the Mac but won’t mount. Scan it, and if it’s unstable, image it first and recover to a different disk.
Also, this Mac external hard drive not mounting video walkthrough might help if you want to see the process instead of reading steps.
Short version:
- shows in System Information only = hardware path exists
- shows in Disk Utility with correct size = chance of recovery is decent
- repeated I/O errors, clicks, disconnects = stop DIY stuff soon
- need files now = recover first, repair later
Erase/reformat is last resort stuff, not “I need my files today” stuff. That part I’m pretty firm on.